The Eternal Maker Crafts

Wednesday 23 March 2016

Grassy Basket

The daffodils are out, and it is definitely feeling like spring. That means that the Easter Bunny is gearing up for the weekend, with all his chocolatey treats.
Here is a quick Easter basket tutorial for those Easter egg hunts, which was inspired by a shopping trip to Waitrose - thanks Janette!

Happy sewing and hunting,
Amber

MATERIALS:
  • Card 
  • Two 20cm contrasting shades of Woolfelt for the grassy look (I have used Grassy Meadows and Moss
  • 20cm strip of Woolfelt for the base, I picked a dark contrasting green, Evergreen
  • Woolfelt for handle (or you can use left over bits from the base)
  • 10cm paper backed fusible web
  • Butterfly and/or flower buttons (from a selection in store)
  • Rotary cutter, Pinking blade, Scissors, Thread to match 

INSTRUCTIONS:
Firstly, make your templates for the grassy sides.
Cut one rectangle measuring 15cm x 14cm and another 25cm x 14cm.
The long sides being the base, from the base measure up 6cm and mark a line. Then mark a 1cm seam around the lower half.
Draw thin long triangles to replicate grass varying the hight of the points, and cut.

Using these templates, place facing up on the light Woolfelt and cut around. I used a rotary cutter then scissors to cut between the gaps to finish - being extra carful with the sharp blade.
Place face down on the dark Woolfelt and repeat.
When these are cut pair them up light with dark, and heat up the iron so that it gets nice and hot.

Cut the fusible web into 4.5cm strips. Using the manufacturers instructions, iron onto the front of the dark Woolfelt lined up with the base.

Peel off the paper backing and place the light green Woolfelt on top lined up with the top edge of the fusible web so that it is approximately 1cm lower then the base of the dark Woolfelt, iron on.

Cut the Woolfelt you pick for the base of the basket into a 25cm x 15cm rectangle.

Pin the grassy edges face up on the base, lined up with the edges. Machine sew the bottom of the grassy edge to the base, repeat on all sides, leaving a 1cm gap on each side.  Repeat for all the other sides.

Once the base is sewn, you'll see that the corner edges will naturally butt up together.  Pin them together how they naturally meet, ensuring that the base felt is pulled out of the way (it'll form a diamond shape in the corner joins).  Sew up each side.

On completion cut away the bulky excess, using a pinking blade on a rotary cutter to mimic the grass look (my new favouite tool!)

You have now got the basket base!
All that you need to do now is pick the colour, length and thickness of your handle. I have gone with some left over Evergreen from the base, cutting my strip 4cm x 40cm. Then using your matching thread hand sew on, at the base and also where the fusible web joins the colours.

Sew on some lovely buttons and you are set for all your Easter hunting, good luck finding all your treats! 

Labels: , , ,

Tuesday 1 March 2016

Denim Roll Top Backpack Tutorial


I've been pondering for a good while over this Robert Kaufman Selvedge Denim - ever since it came in late last year.  On the one hand, this denim is thick, sturdy, durable, gorgeous colour, and has that awesome selvedge.  On the other hand, it's super thick and sturdy, and has that awesome selvedge that you definitely want to keep - and it's quite narrow.  What on earth could I make with it?


And finally, yesterday, it came to me.  I was doing the finishing touches on my Hidden Panda Rucksack (more to come on that one later) and was trying to figure out how to do the straps.  And as I thought further, I wondered whether you could make a feature of the straps with different coloured webbing, and whether you could bring this across to the front of the bag.  And if you were to do that, then the main fabric should be fairly plain.. something like a denim... I think you see where I was going with it.

This backpack is completely unlined - the canvas is so thick it's entirely unnecessary, and it has simple flat pockets on the inside. 


Shopping List:
Selvedge Denim or other type of thick canvas - 80cm x 80cm
Webbing: Red - 40mm/1.5" x 1.5m, 25mm/1" x 40cm
                Navy - 40mm/1.5" x 1m, 25mm/1" x 60cm
Metal Sliders: 25mm x 2, 40mm x 4 (I actually used 50mm, which worked just fine too)
Denim sewing machine needles 
We've put together a kit of supplies for this backpack - you can find it here.

Method:
Divide your 80cm of denim into two pieces measuring 40cm x 80cm - with the selvedge on the narrow edge.  Cut 25cm off the bottom of each piece.

On one of these big pieces you need to place the straps.  I decided to use my denim with the right side on one side and the wrong on the other.  I placed the straps on the wrong side piece. 

From your red 40mm webbing cut one 30cm piece, and cut the remainder in half.  This 30cm piece will help keep all your straps secure in a band across the top.  Divide your navy 40mm piece in half, and cut 15cm from your 25mm navy webbing. 

Place your webbing in the following formation on the bag piece:
Measure 20cm down from the selvedge top of your piece, and underneath this line, centrally place your 30cm red webbing piece, folding under the raw edges, pinning to secure. 

In the centre of this piece, tuck the 40cm of 25mm red underneath, facing up.  Pin.

Over the top of this, fold your 15cm piece of 25mm navy into a loop, and tuck both ends either side of the red 25mm piece.  Pin into place.

Take each half of your navy 40mm piece, fold in half, thread on 2 of the large metal sliders, and pin under the red band approximately 1cm from the edge.  Do this for both sides.

Sew around the edges of the red band, making sure to catch all the pieces you've tucked in.  You may want to do extra stitching to help secure it all for strength.

At the bottom of this bag piece, fold your 25mm navy webbing in half, thread on the two small sliders, and pin in the centre bottom.

Take your two remaining 40mm red webbing pieces,and pin into place 10cm from each edge along the bottom at an approximate 45 degree angle.  Tuck the long edges of these pieces in towards the centre, so when you stitch around the edge you won't catch any of the pieces on it. 

Lay one of your small bag pieces in front of you, with the selvedge at the top, and then the panel with all your webbing pieces face up on top of it, lining up the bottom edges.  Lay your other bag piece over the top facing down, and then lay your other small pocket piece along the bottom edge again.  Align the bottom and side edges of all your pieces. 
Using your denim machine needle, as this will be super thick work, sew around the sides and bottom of your bag, making sure to catch the bottom edge pieces of webbing but not any around the sides.  You may want to sew around this twice, for extra stability.

Next, we'll make the gusset.  Cut a 5cm square from the bottom corners.  You may have a struggle with cutting through so many layers of thick fabric - I actually ended up cutting through one layer at a time - poking through each layer with a sharp pair of embroidery scissors.  Discard your cut off pieces.
With one corner, take the cut corner, and pull open until it lays flat the other way - with the sewn seams meeting in the middle.  Sew along this line carefully - making sure all the layers are flat and the seams are matched.  Sew back and forth a couple of times, to aid the strength.
Neaten all your seams the best you can, then turn your bag the right way out, poking the corners to push them out properly.

Next take all your raw edges of webbing and fold over 5mm and stitch for a seam to neaten.  Sew along the webbing with your sliders on, as close as possible to your sliders to hold them into place.
And you're all done!  Fill it with your picnic, get on your bike, and go have a jolly day out with lashings and lashings of ginger beer.  Or something like that...

Anna x


Labels: , , ,

Tuesday 2 February 2016

Two Lovely cushions


Lovely cushions


Hi Eternalmakers hope you're all well. We are gearing up for the international day of love here at the Eternal Maker and thought, you might like a couple of easy to follow Tutorials with a Love theme.
As with the rest of the team, this is my first online Tutorial, hope you like it! :)

Small Heart Cushion: 

You will need: 
A small cushion pad. (I used a 12" x12")
Paper, Pencil, Ruler, Rubber
Scissors or Rotary Cutter
Cutting Mat
Seam Ripper (just in case!) 
Fuse and Tear stabiliser 
Fusible Web
Main front and back fabric (2x FQ's will be fine)
Scrap fabrics for hearts. (I used Riley Blakes LoveBugs Collection)
Scrap bias tape about 13"
Trimmings, Ribbon and a Button
Contrasting Cottons for stitching
Sewing Machine, Iron and Ironing board


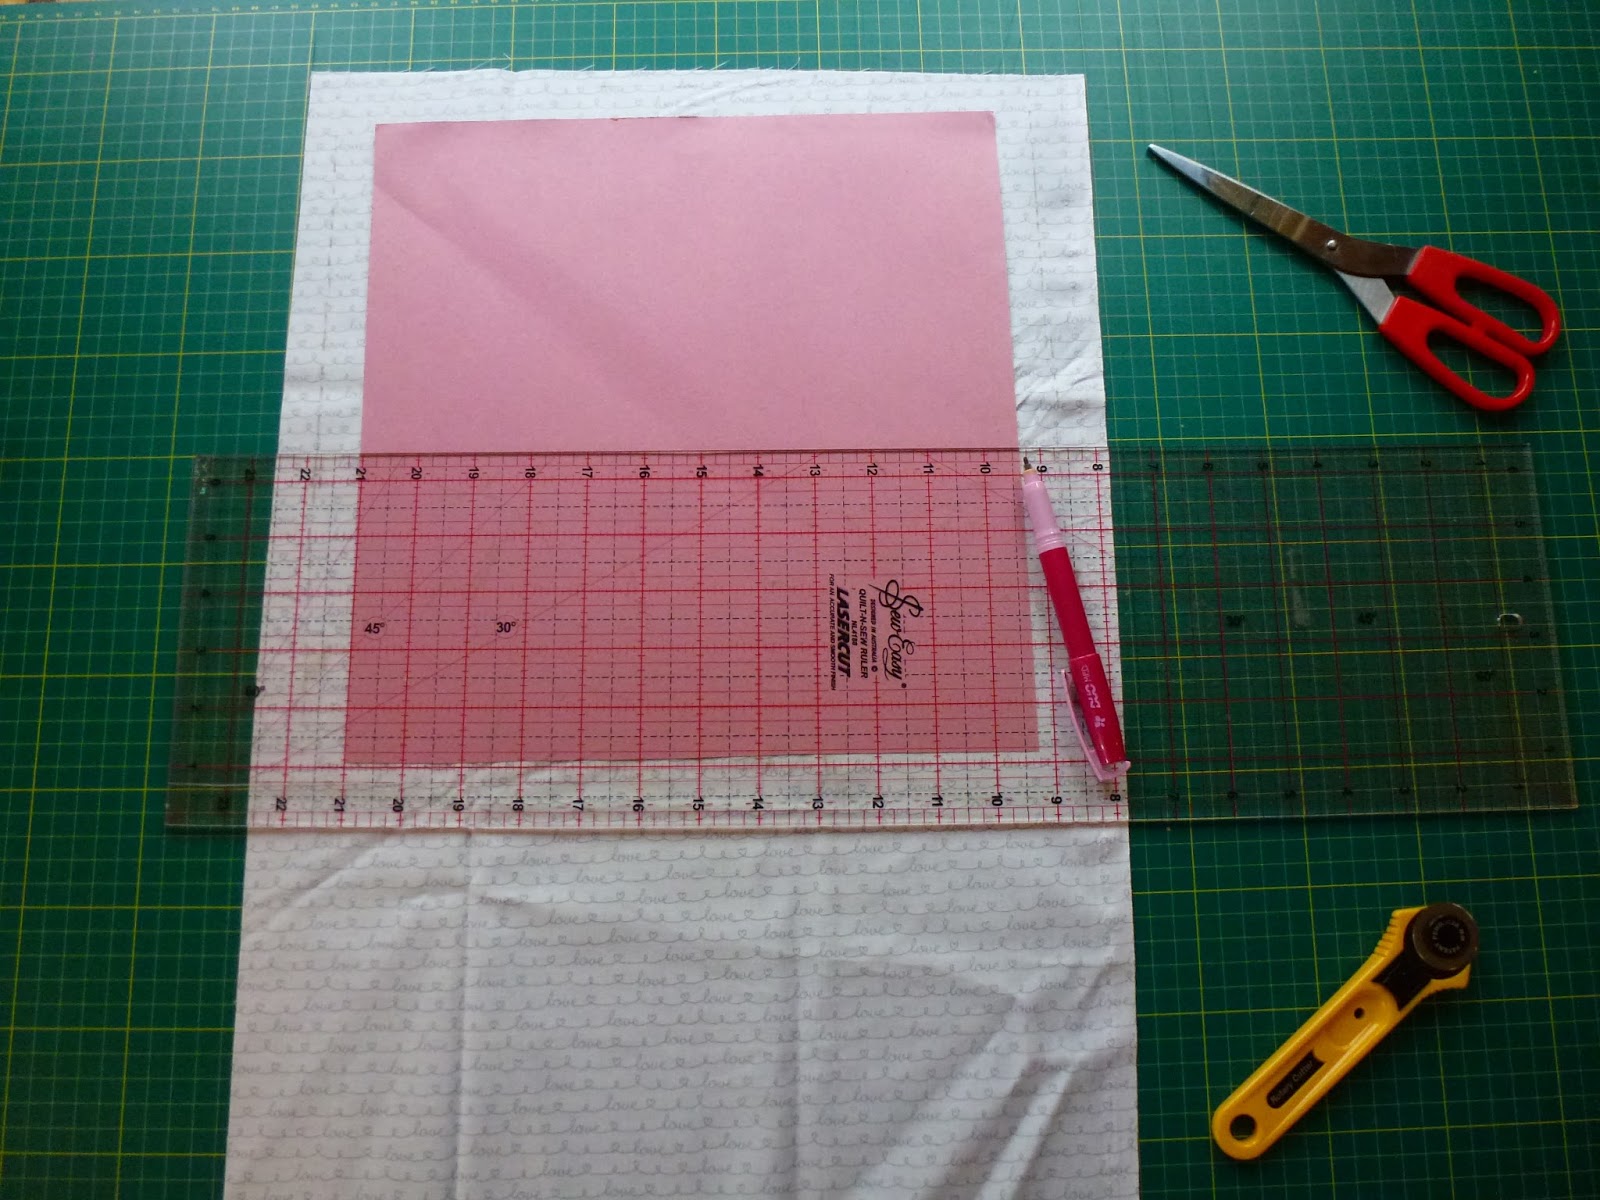
Cut yourself a paper pattern an inch larger than your cushion pad, so in my case 13' x13' and pin this to your front fabric. Then cut out and put to one side.


Using your cut out pattern, mark about 2 thirds down, dawn a line and fold. This is now going to be your pattern for the back. Pin to your backing fabric and cut out 2 pieces. and put to one side.


Now cut yourself 3 hearts shapes in large, medium and small out of paper. With your scrap fabrics iron on your fusible web. Pin on your heart patterns and cut out. If you don't want to pin you can just draw onto the paper side  of your fusible web and cut out.

While you've got the iron out, you can give your main fabrics a quick iron.
 
Choose yourself a layout, play around until you're happy!
 

Once you have chosen  your design, remove the paper from the fusible web and iron your hearts onto your main fabric. On the reverse of your main fabric, Iron on your Fuse and Tear. This will help stabilise your fabric when stitching the applique.
 

Using a contrasting thread, thread your sewing machine and stitch around the small and medium hearts in a normal straight stitch. Then set your machine to the applique setting. On my machine it's the Zig Zag stitch, set to about 0.5 on length and width. Please read your manual and have a play with the stitches before you go around your hearts. 
Once your have your applique heart stitched all around the outside edge, pull from the machine leaving 2 long loose threads.  


  TOP TIP: Using a normal sewing needle, place the needle into the fabric next to the loose threads. Thread the needle with the 2 loose threads and pull them through to the wrong side of the fabric. Now they are on the underside of your fabric tie off. This prevents a messy knot on top of your applique. Tear away any excess stabiliser.


Now to pretty up the back. Pin your bias to one of the long edges of your top fold fabric. Cut yourself a 3 inch piece of ribbon. Find the centre point and pin you ribbon on the inside of the bias edge. This will be your button close. Stitch the bias and ribbon to your fabric.
With the second piece of backing fabric, iron a small lip about 5mm along the long edge. Fold again over the top of the ironed edge and iron. This gives you a nice crisp edge to work with. Pin and stitch. 


Pin your trim around the outside edge of your front fabric over lap about 2 inches at the start and finish. Once pinned you are going join your start and finish ends together with a straight stitch. When you have joined your ends stitch all the way round to hold your trim in place.


Lay your bias/ribbon piece of backing fabric onto the trimmed front fabric. Lining up your fabrics with the outer edge and the right sides together. Then place the other backing fabric over the top of the other two fabrics, lining up with the outer edge and pin in place. Stitch all the way round with a 1/2 inch steam allowence. (Always remamber to back stitch at the begining and end) Trim the corners and any excess fabric begging careful not to cut into your seam!


Insert your cushion pad into your lovely cushion cover. With a pencil or maker make a mark where you would like your button to go. Remove cushion pad and hand sew your button into place.


Insert your cushion pad back into its cover. Stand back and admire your awesome new cushion!!
Right now your ready for the next one! :)


Zipped Cushion:

You will need:
A medium cushion pad. (I used a 15" x15")
Paper, Pencil, Ruler, Rubber
Scissors or Rotary Cutter
Cutting Mat
Seam Ripper (just in case!) 
Fusible Web
Main front and back fabric
Scrap fabric strips about 1.1/2" wide
14"  Nylon teeth Zip
Contrasting Cottons for stitching.
Aurifloss or Embroidery thread.
Sewing Machine, Iron and Ironing board


Cut your back fabric 16" x 16" or an inch bigger then your cushion pad. I used a grey Linen blend for the back.  For the front I used two contrasting fabrics, the top part is a soft Shetland Fannel cut to 16" x 10.3/8" Then for the second piece I used the same as the backing fabric cut to 6.1/2" x 16"
Sew your two front pieces together and iron your seam out flat. (Always remember to back stitch at the begining and end of your work)


Cut out five 9" x 1.1/2" strips of scrap fabric. I've stayed with the Riley Blake Lovebug Collection. Iron on your fusible web. Peel off the backing paper. Lay them on your front fabric in a staggered fashion and iron into place.


Using your contrasting thread, stitch round each strip. I went around about three times, over lapping in places to give it a kind of pencil drawn effect.


TOP TIP: Using a normal sewing needle, place the needle into the fabric next to the loose threads. Thread the needle with the loose threads and pull them through to the wrong side of the fabric. Now they are on the underside of your fabric, tie off. This gives a neat finish to your work.


Next, you need to do a little free hand embroidery. I used the variegated Aurifloss in Pink and Black. On the reverse side of your front fabric, using a ruler and pencil, mark with a dot every 1cm. About 1cm under your dotted line, do the same again but stagger your dots. Repeat for the third line. Now stitch all the way along in and out of your dotted lines until you have an effect your happy with.


Now for the zip! On the reverse side of your front fabric, find the centre by folding your fabric in half and scoring with your fingers. Do the same with the zip and line the two up at the centre mark. With a pencil, mark where the zip pull and the zip end are on the reverse side of the front fabric. Put the zip to one side. With a normal stitch on your machine, stitch to the first mark (remembering to back stitch at the begining and end) Now change your machine stitch to a basting stitch (longest stitch on your machine). Stitch to the next line. Change back to normal stitch, back stitch and continue to the end. Iron out the seam.


Change to a zipper foot on your machine. Lay your zip on the middle of the seam using your earlier markings. Making sure your zipper teeth are along the centre of your stitched seam. Pin and baste into place. Remove pins. Starting from the bottom of the zip, stitch towards the zip pull. When you are about 2 inches from the zip pull, push the needle into the zip, lift the foot and push the zip pull to where you have been stitching. Put the foot back down and continue stitching just past where the zip pull stops. Needle into the zip, lift foot and rotate fabric, needle down and sew across the zip. If you are using a metal teeth zip, DO NOT USE YOUR SEWING MACHINE TO STITCH ACROSS YOUR ZIP, YOUR NEEDLE WILL SNAP!! (In this case hand stitching is better.) Needle down, foot up rotate, foot down and stitch. Sew a little way. Needle in, lift foot. Now to get your zip pull back heres another TOP TIP using your seam ripper push the blade into the hole of your zip pull and pull it back into place. This is much eaiser then fiddling around with your fingers! Foot down and continue stitching to the end of the zip. Needle in, foot up, rotate and continue across the zip.


Using your steam ripper, carfully rip open the basted stitches to reveal your zip! Open you zip slightly. With the right sides together pin your front and back pieces together and stitch around the three open sides. Trim any excess fabric from the inside of your cushion. Take out pins. Turn it right side out, via your open zip. Insert your cushion pad and volia!! One fabulous cushion!!


Thanks, Janette xx


Thursday 21 January 2016

Toilet Roll Holder Tutorial


This project has been lurking in the back of my mind for far too long. I’m usually pretty quick at getting things like this done once the idea is fully formed. I’ve seen a few ‘ancient’ forms of loo roll holder around the world but nothing that would suit the modern bathroom. I found myself really bothered about loo rolls hanging around different bathrooms in baskets on the floor, windowsills and such inappropriate places. So finally, much to my husband’s amusement, I sat in front of the TV set a couple of evenings ago with a loo roll, a tape measure, notepad and pen in hand. Result! Here’s what you need and what you do:

MATERIALS:
-½ metre of fabric (if you’re using the same fabric for the whole project)
or
-25cm x 110cm (long quarter) for the front and a fat quarter for the back
-½ metre of medium weight fusible interfacing (Vilene 250/305 or similar


PATTERN:
For the back, cut 2 x A (45cm x 14cm) from the main fabric and the same amount of interfacing
For the front, cut 2 x B (94cm x 12.5) from main fabric and 1 x B (94cm x 12.5cm) from interfacing
For the loop, cut 1 x C (15cm x 5cm) from main fabric


INSTRUCTIONS:

Back: Place the fusible interfacing sticky side down on top of the wrong side of the main fabric pieces (A). Iron on as per the manufacturer’s instructions, then pin together, right sides facing. Sew together along the the long edges only, leaving a 5mm seam allowance. Leave it like that while preparing the front piece.

Front: Place the fusible interfacing sticky side down on top of the wrong side of one piece of main fabric (B) and iron on. Pin pieces B on top of one another with right sides facing then sew together the long edges only, leaving again a 5mm seam allowance. Turn it the right way out, finger press and then iron the edges flat.


To join the two pieces, feed front piece B through the back piece A. This should be easy as you’ll note B is a little narrower. Making sure to position it in the middle, pin the two short edges together then sew. Pull the front piece out and use this action to turn the back piece the right way out as well. Finger press its edges and then iron them flat.


To form the loo roll ‘pockets’, lay the pieces flat and starting from the joint between front and back, mark three lines across the back piece, measuring 13cm in between, then three lines across the front piece, measuring 30cm in between. Fold the front on top of the back matching the lines marked earlier. Sew across these points with a tight stitch.


You’ll have about 3cm on the top of the front piece left to tidy. Fold the raw edge under, pin and sew close to the folded edge. 

To create the loop from piece C, fold it in half lengthwise to mark the middle. Open it up, fold the raw edges to the centre, fold in half again and pin then sew. You’ll have ended up with a 15cm strip.

Fold about 5mm of the raw edges on the back piece (A) inwards from all sides and pin the loop at the same time between, placing it 3cm in from each side.


Stitch in place close to the edge and you’ll have ended up with a perfectly formed loo roll holder.


NOTES: I've used a natural linen fabric for the back and a cotton, quilting weight fabric for the front. I kept this as simple as possible just for instruction purposes, but you can use any odd fabric and be as creative as you like. In fact, if you're a quilter and you have scraps you'd like to use,  go ahead - we would love to see what others come up with. 

And last but not least, I've a confession to make: I've been sewing, designing and creating for a very long time, but this is my first blog post for the Eternal Maker since I started working here. I’m more of a maker than a writer, so I hope it all makes sense and you’re happy with the results. Feedback would be wonderful. Enjoy!


Dhurata